Although the following guide is based on a specific format (DVD MPEG-2) and encoder (TMPGEnc), the principles it describes can be applied to most video compression formats and applications, especially those based on the MPEG specifications.
Bear in mind, though, that the allowed (and optimal) settings for each medium can be different; if you're encoding video for web distribution, VCD, SVCD, etc., you will need to make some changes to the values suggested in this guide.
![]() Note...
Note...
This guide is based on a stand-alone (and possibly no longer available) free version of TMPGEnc. Most of the information contained here is still relevant for MPEG encoding, but some of the options and menus look substantially different in newer TMPGEnc products. This site and its author are in no way associated with Pegasys Inc. or TMPGEnc, receive no profits from its sales, and have no access to their newer commercial products. Please direct technical support requests regarding these new products to the Pegasys, Inc. customer service department.
Nowhere in these pages do I make a TMPGEnc template available for download. This is deliberate. There is no magic formula to get good results out of any encoder. Video encoding is a complex process and programs that pretend to make it simple always compromise the final quality. While technically it would be possible for a program to achieve nearly optimal compression settings, this would require extensive footage analysis and multiple passes, which would take an unacceptable amount of time to complete. Despite the speed of modern CPUs, the human brain is still able to make some complex decisions much faster than any computer on Earth, as long as it has enough information. My aim with this guide is to provide you with the information necessary to understand how MPEG encoders work and to decide which settings are more appropriate to each situation.
![]() Note...
Note...
Beware of guides or templates promising magical optimisations to speed and quality. If it were possible to configure an encoder in such a way that you always got the best quality in the least amount of time, then the encoder would simply default to those settings, and there would be no need to configure it in the first place.
If you haven't already, start TMPGEnc (by double-clicking on a shortcut or on the excutable file). If TMPGEnc starts with a wizard, close it and use the full configuration interface. You should see something similar to the following screenshot (click on the thumbnail to enlarge the image):
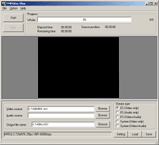
Fig. 1 - Main window
This is where you define the input and output files and the
stream
type. Other options are available in the menu and by clicking on the
Setting
button in the lower right (more on those shortly). There is also a preview window where you will be able to see what part of the clip TMPGEnc is encoding.
If some settings in TMPGEnc appear to be
locked,
this may be due to the fact that you loaded one of the original templates. To unlock all settings, load a file called unlock.mcf that you will find inside the template\extra sub-folder. Newer versions of TMPGEnc also let you unlock the settings by clicking on the text on the left side.
Set the Stream type to ES (video-only).
ES stands for "elementary stream"; this tells TMPGEnc that we are only going to use it to encode video, and that we want the resulting file to have no audio information.
There is also an option named System (video-only) that tells TMPGEnc to create a file with audio and video information (also called a "system stream"), but leave the audio stream empty. This results in a file with a slightly different structure. Generally it's preferable to use elementary streams.
There are two reasons not to encode the audio in TMPGEnc:
The first is the fact that MPEG audio is not standard on all DVD players. Although it is supported by all PAL players (and most modern NTSC models), some authoring programs still refuse to add MPEG audio directly to their projects, and will instead convert it to PCM (uncompressed). Since MPEG audio uses lossy compression, the quality that was lost in the compression is not recovered. By contrast, the space that was saved by the compression is lost again. So, using MPEG audio in these programs is a lose-lose situation. The only two formats guaranteed to be compatible with all players are PCM and AC3.
The second reason is the fact that there are several MPEG audio encoders that produce better quality than TMPGEnc (here is a list of MPEG-1 Audio Layer II encoders).
Once the video and audio files have been created (in TMPGEnc or elsewhere), the way to load and link them together (regardless of compression format) for DVD creation depends on your DVD authoring software. Please consult its manual or help file for the exact procedure.
After setting the stream type, click on the Setting button in the lower right corner of the main window.
The settings window is divided into several tabs (at the top). The following sections describe each tab and its settings starting from the left side.
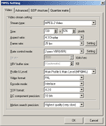
Fig. 2 - Video
In this section you define the video settings for the resulting file. If the source footage's dimensions or frame rate are different from the ones listed here, TMPGEnc will attempt to convert them to these settings. For best results, you should avoid any resizing or retiming, and make sure the original files are already in the right format (described below).
Stream type: |
This is the DVD standard (also used by SVCD; VCD uses MPEG-1). |
||||||||||||
Size: |
These are the standard, uncropped DV / DVD / D1 full-resolution sizes. There are also cropped modes ( |
||||||||||||
Aspect ratio: |
The aspect ratio should usually be the same for all clips (some authoring programs won't let you use clips with different aspect ratios in the same DVD, although the DVD specification allows it). If you select the wrong aspect ratio, the image will be squashed or stretched. 16:9 is referred to simply as "widescreen" in some software, but it's important to note that there are many different widescreen formats. DVD streams use either 4:3 or 16:9. |
||||||||||||
Frame Rate: |
A third frame rate ( |
||||||||||||
Rate control mode: |
In 2-pass VBR mode, the compressor will make two passes. In the first pass, it will compress the footage while trying to keep a constant quality, regardless of bitrate. It will then use the resulting bitrate (scaled to fit within the user-selected values) to do the final encoding. This results in the best relationship between compression and quality. It is, however, rather slow. If you use CBR at 8 Mb/s, you will end up with more or less the same quality, but the compression will not be as efficient. This means that the resulting file will be bigger, and you will not be able to fit as much video into one disc. If your movie has less than 1 hour, and you don't have any use for the extra space on the disc, you should use CBR to save on the encoding time. |
||||||||||||
Rate control settings: |

Fig. 3 - Rate control
You may use a higher value for the maximum bitrate (up to 9000 or so) if you're going to use compressed sound or if the DVD won't have any sound. You may want to decrease the bitrate (especially the average bitrate) if the footage you're encoding is too big to fit in one DVD. Keep in mind that the final bitrate on a DVD cannot exceed 9.8 Mb/s (including sound, subtitles, etc.), and the value you select here applies only to the video. Generally, a value of 6000 for average and 8000 for maximum will produce good results and allow you to fit about 90 minutes into a 4.7 GB disc (assuming you will use compressed sound; if you use uncompressed sound, then you will only be able to fit about 75 minutes into one disc at that bitrate). The spoilage values are used by the compressor to judge the quality of the resulting stream. A higher value means a lower quality will be considered acceptable. Note that the spoilage value in TMPGEnc is relative to the latest I-picture, and not to the original frame. This means that a negative value will try to refine the image if possible (at the cost of extra bitrate). This not as useful as it seems, and in some cases (ex., still images) can actually cause a subtle shimmering, as the quality actually drops slightly at the start of each group of pictures, and then goes back up. So, generally, you should leave the spoilage value for P-pictures at zero. Setting the B-picture spoilage to zero (instead of the default 20) will improve the quality (at the cost of bitrate), but generally if you want top quality you won't use B-pictures anyway, so I recommend using the default value. If you select "old type", or if you use an older version of TMPGEnc, these options will not be present. Some authoring programs don't like files with bitrates that drop below a certain level; if this is the case with yours, set the minimum value to 2000 or higher and enable padding. Other programs don't like files where the bitrate goes beyond a certain level; if this is the case with yours, avoid setting the maximim bitrate to a value above 8000 kb/s (some old players also have problems when the video uses more than 8000 kb/s).
I have coded a bitrate and GOP calculator for video encoding. It takes information about the length of your movie and its format and suggests values for the rate control mode, bitrate and GOP picture types (described below). You can find a link to it in the menu on the left side. | ||||||||||||
VBV buffer size: |
This is the expected size of the video decoder buffer (basically it controls how many bytes an individual frame can use). You may set this value manually, depending on the format you're encoding for (use |
||||||||||||
Profile and level: |
This refers to the type of decoder necessary to read the resulting file. Using higher values may improve the quality, but will make the video incompatible with many set-top DVD players. MP@ML stands for "Main Profile / Main Level" and is the DVD standard. |
||||||||||||
Video format: |
Depending on the standard you want the resulting DVD to use. |
||||||||||||
Encode mode: |
Normally, video is interlaced. This means that odd and even lines are shown alternately, instead of simultaneously (and recorded in the same way, naturally). DVD video should generally be interlaced even if the source footage is not (there are exceptions, such as 24-fps film flagged with 3:2 pulldown, for NTSC, but if you're working with film you probably know that already). |
||||||||||||
YUV format: |
This means that for every square of four pixels (2x2) there are 4 brightness samples and 1 colour sample (divided in 2 components). This is very similar to the sampling used by PAL DV (the difference has to do with the way the colour information is sampled inside that 4-pixel square, which also depends on the codec). NTSC DV uses a format called 4:1:1 where colour information is stored for (horizontal) segments of 4 pixels, instead of 2x2 squares. The "square" approach usually produces cleaner-looking images, with less colour bleed, and it's a bit of a mystery why NTSC DV uses 4:1:1 (analog NTSC is a nightmare but they could have got it right when they moved to digital). Regardless of your footage's format (PAL or NTSC), DVD MP@ML MPEG-2 always uses 4:2:0. This is the reason why PAL DV transfers to DVD much better than NTSC DV does. NTSC footage recorded in 4:2:2 (ex., Beta) does not have this problem (nor does 4:2:2 PAL, naturally). |
||||||||||||
DC component precision: |
This controls the precision of the discrete cosine values used in the image compression (this translates the image into a series of interfering frequencies and lets the program eliminate frequencies that aren't visually relevant - this is similar to the compression used in JPEG images). Higher values results in better quality, at the expense of encoding time and file size. For very low bitrates (i.e., under 3000) you should use a lower precision, since the space used by the DC coefficients will leave the encoder less bandwidth for the remaining data. |
||||||||||||
Motion search precision: |
The motion search algorithm is the heart of an MPEG encoder. MPEG works by dividing an image into several small areas (called blocks), and then trying to find blocks that are present (in different positions) in more than one frame (and storing only one copy of that block). Since most blocks will usually look slightly different, some extra data is still necessary to reconstruct the real image, but the more similar the blocks, the smaller those "corrections" will need to be. A better search algorithm will get better block matches, and thus achieve better compression (or better quality for the same level of compression). Despite being very slow, TMPGEnc's motion search algorithms are some of the best of all MPEG encoders, and they are responsible for its usually excellent quality. If you need faster encoding, select the |
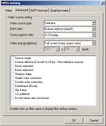
Fig. 4 - Advanced
In this section you define how the source footage should be interpreted, how it should be resized (if necessary) and what (if any) filters should be applied to it.
Video source type: |
This refers to your original footage. The vast majority of video cameras records in interlaced mode. Some cameras can optionally record in a non-interlaced mode called progressive scan. If your source footage is progressive scan video, film or non-interlaced animation, select |
Field order: |
This setting is the source of many problems, since some systems don't say what field order they use, and some pseudo-DV systems actually capture in analog mode. The field order is set by the capture hardware, not by the editing program, so you can't change it in software without re-compressing all the footage (note that, in digital formats, the "capture hardware" is the camera, unless the video is later converted to a different format). All you can do is make sure you set this parameter right, so that TMPGEnc knows how to encode the file. If you notice your MPEG video flickers whenever there is fast movement, the most likely cause is a wrong field order setting. Note that this will only be noticeable on a video monitor or TV set; computer monitors are not interlaced, and always show odd and even lines at the same time. |
Source aspect ratio: |
If source footage dimensions are the same as the output dimensions, then selecting |
Video arrange method: |
If your source footage has the correct size (i.e., the same as the output size, selected in the Generally, if your source footage does not match the DVD resolution, it's best to resize it using an interactive program (that will show you the result immediately), and then feed the resized footage into TMPGEnc. If you resize directly in TMPGEnc you will only see the result after the compression is finished, so if you select the wrong mode you will have wasted a lot of time. |
Filters: |
Normally you will not need to apply any filters, so make sure none are selected, or processing will take longer. In some situations, however, some filters may be useful. For example, |
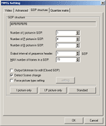
Fig. 5 - GOP
MPEG uses temporal compression, where one frame (or picture) can re-use parts of another (ex., parts that haven't changed, or that have changed only slightly) to save space. But since it must be possible to decode one part of the MPEG stream without loading the entire stream into memory, the temporal compression is limited to relatively small groups of pictures (called GOPs). The settings in this section control what kind of compression is applied to each frame and how the stream is divided into GOPs.
Number of I pictures: |
I-pictures are compressed independently (using an algorithm similar to JPEG images). This means they're ideal when the image changes too much (because they don't rely on temporal compression), but take up a lot of bits. So if you use too many I-pictures, you will need an overall higher bitrate to keep the quality up. If you're using very short GOPs (under 6 frames), you may increase this value and effectively have several sequences in each GOP (see note at the end of this section). Generally, though, stick with one I-picture per GOP. |
Number of P pictures: |
P-pictures are based on previous I and P-pictures. This means they can re-use existing parts of the image and therefore take up much less bits than I-pictures. Using P-pictures lets you keep an overall lower bitrate (and indirectly use the excess to improve the I-pictures). However, P-pictures may exhibit poor quality if there are too many changes from the previous frame. The option to detect scene changes (below) will avoid this by automatically inserting an I-picture when it detects a big change between two frames. If that option is disabled, use a lower number of P-pictures (ex., 3 or 4). |
Number of B pictures: |
B-pictures are based on past and future I and P-pictures. They provide the best compression but, as with P-pictures, have problems when the image changes too much. Also, bear in mind that B-pictures cannot be based on other B-pictures, so don't use too many in a row or the image quality will suffer, especially if there are any cuts or sudden changes. B-pictures also take longer to encode, because they must search more frames for matching blocks. If you're using a high average bitrate (above 6000 kb/s or so), you can (and should) use I and P-pictures only (ex., 1 I-picture and 14 P-pictures). |
Max. frames in GOP: |
These are the standard DVD limits. This option is not present in older versions of TMPGEnc. If you're using one of those versions, you will need to control the number of frames using only the three previous settings. If a GOP has more frames than the standard allows, authoring programs will usually reject the file, and some players will not be able to play it. |
Output interval of header: |
This tells TMPGEnc to include a header describing each GOP before the actual GOP. This is required by many authoring programs. Without this option, some programs will reject the file. |
Output closed GOP: |
If you plan to edit the MPEG file or if you're creating streams for multi-angle DVDs, then you should turn this on. Leaving it off improves the compression.
If for some reason your authoring program rejects your files, try enabling this setting; I've been told that some programs have problems dealing with open GOPs. In general, however, you should leave this off, as you'll get better compression (especially if you use B-pictures in your GOP). |
Detect scene change: |
This will automatically insert I-pictures when it detects very big changes in the image. This option increases the encoding time, but not very significantly. If you enable this option, you can increase the number of P and B-pictures so that the GOP becomes as long as possible (ex., 14 P-pictures and no B-pictures, or 7 P-pictures with 1 B-picture). If for some reason you want all GOPs to have exactly the same structure (ex., authoring a multi-angle DVD), you should disable this option and use shorter GOPs to minimise problems when the scene changes. Alternatively, use the picture type setting (below) to manually mark scene changes and make sure the GOP structure matches between angles. |
Force picture type: |
This lets you define the picture type and encoding parameters for each frame in your video clip. This is a difficult and tedious process, but if you are encoding some very complex (and short) clips, it may pay off. If you are planning to create chapter points later (in your DVD authoring program) and want them to be frame-accurate, you may use this to start a new GOP at the points where you want to put the chapter marks. In older versions of TMPGEnc, enabling this setting automatically disabled scene change detection. In newer versions, the two can co-exist. |
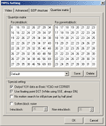
Fig. 6 - Matrix
The quantisation matrices are used by the compressor to decide how accurately the frequencies present in the image need to be represented. Typically, lower frequencies (corresponding to the top-left corner of the matrix) should use lower quantisation, and thus higher accuracy. This section also contains a couple of other options that influence how each frame is coded.
Quantize matrix: |
Quantisation matrices are a complex subject, and I won't go into much depth here. In most cases you don't need to worry about the technical details; simply select the appropriate preset from the list. TMPGEnc's |
Output basic YCbCr: |
Generally, you should select this option; it will preserve the original contrast of your source footage. If your source footage is high-contrast computer-generated animation, disabling this option will ensure its brightness and saturation remain within "legal" video limits. Some DV codecs seem to automatically compensate for this difference between video signal and digital colour range, which will make the resulting output seem too dark. If you notice the MPEG file looks darker than the DV original (the difference will be something around 8%), try disabling this option and see if that corrects the problem. Sony's and Canopus's codecs seem to keep the original range when decoding (meaning this option should be enabled). I have been told that Adaptec's and MainConcept's DV codecs perform automatic range scaling when decompressing, so if you're using one of these, disable this option. If you have information regarding other DV codecs, send me an e-mail (use the menu on the left). |
Floating-point DCT: |
This will improve the quality by minimising round-off errors. In systems without SSE support, this will also make the encoding take longer, but will produce the same results. |
No half-pixel motion: |
Turn this on if you notice still images look blurry, or if you're encoding a slideshow. Leaving it off will improve the quality of areas with slow or subtle motion. |
Soften block noise: |
If you're encoding MPEG-1 or low-bitrate MPEG-2 you may benefit from turning this option on; it will make the image lose some sharpness, but will eliminate some compression artifacts (blocks). For DVD you'll usually use a high bitrate, so you should leave this off. |
Two more tabs will appear if you select Video+Audio instead of Video only as the stream type. These are Audio (where you set the audio format) and System (where you specify how the audio and video should be organised inside the resulting file). For the reasons mentioned at the beginning of the guide, however, you should not encode the audio in TMPGEnc, so I will skip these (the options are quite straightforward, anyway).
Now that you have created an encoding template, click on OK and then Save it in TMPGEnc's Templates folder with any name you want (ex., VBR-PAL-DVD.MCF). Every time you use TMPGEnc, remember to load that template so all your settings are restored. If you install a new version of TMPGEnc, you should re-create the template manually. Old templates may not load correctly (and there might be new options).
Before closing TMPGEnc, go to the Options menu, pick Environmental setting and make sure the Folder setting for Temporary file points to a drive with plenty of free space. You may check the other options here, but most of them aren't very relevant (and the default settings are fine).
If your system has multiple processors (or a multi-core processor), make sure the option to Use multi-thread is enabled, otherwise TMPGEnc will only use the first CPU. If you only have one single-core CPU, enabling multi-threading will usually make things slower.
Be sure to check the FAQ section (accessible from the menu on the left) for extra information and tips on video encoding.
![]() Note...
Note...
How much was this guide worth to you? More than an original Stradivarius? Less than a scratched Vanessa Mae CD? You decide. Click the link below and enter the amount you consider fair. You will need a valid credit card or a PayPal account.
PAY WHAT YOU LIKE!
If you have any questions or comments about this guide, post a message in the forum. If you quote this guide on other websites, in your e-mails, academic papers, etc., please include a link to this page.

